Ana Sayfa Blog Sayfa 11

Amigurumi Snow Doll Free Pattern

0

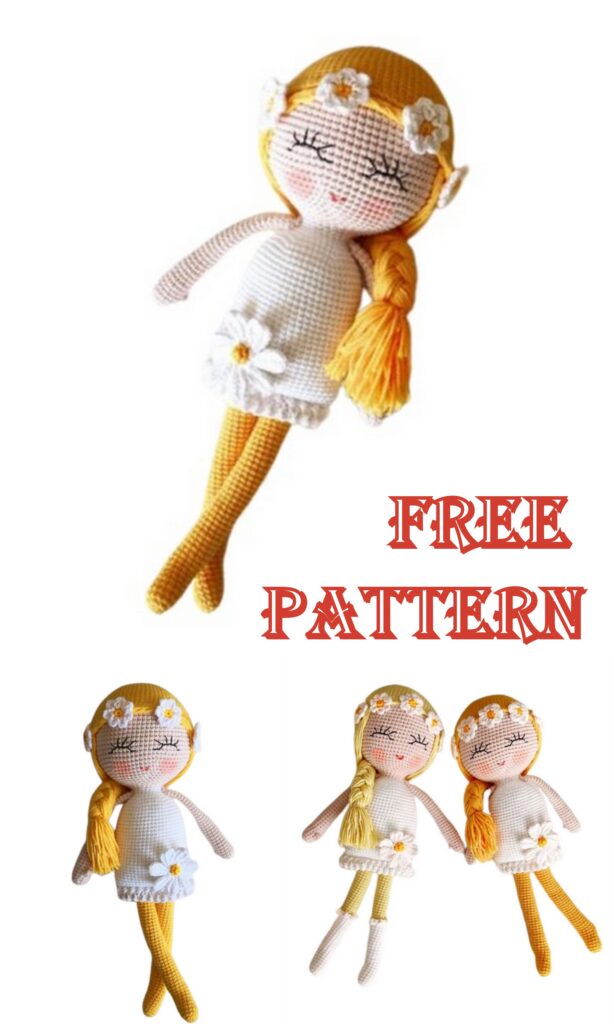
We share a amigurumi doll pattern dressed in white for free. I hope you will like it. Stay tuned.


– flesh-colored yarn (YarnArt Cotton Soft-100/600);

– white yarn for hair and boots (Vita Brilliant – 100/380);


– filler (synthetic winterizer, holofiber);

– eyes (beads, half beads), eyelashes;


– wire 1.5 mm;

– hook 1.25;

– a needle for stitching parts.
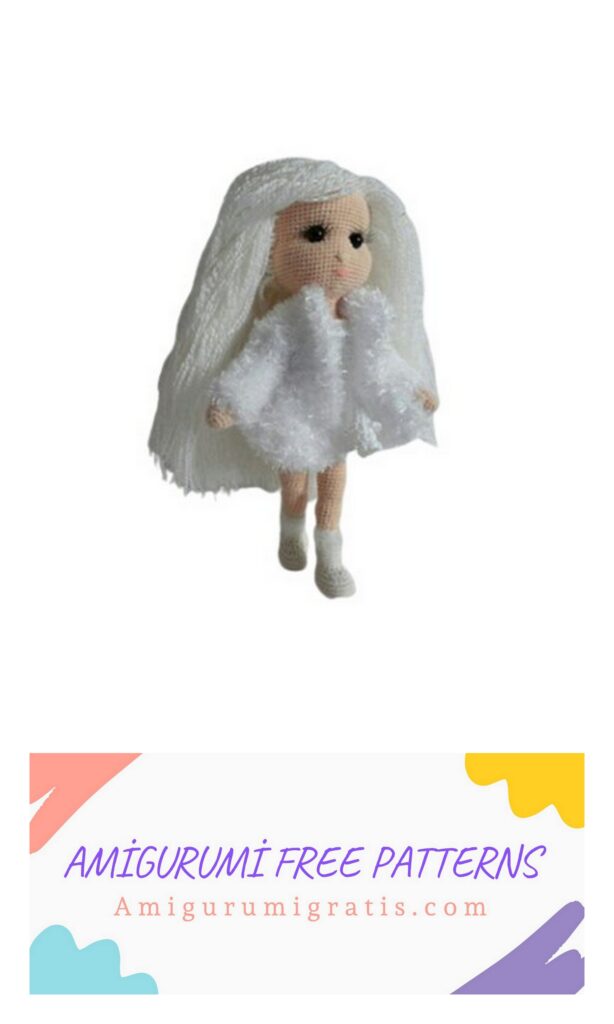
Legend:

sc – single crochet

inc – increase (from one loop of the previous row, knit 2 sc)


dec – decrease (two loops together for the front walls)

hdc – half crochet

dec hdc – decrease with half crochets (double crochet, knit two loops together for the front walls, then knit: the resulting loop, crochet and working loop).

DIY Snow Maiden description and scheme:

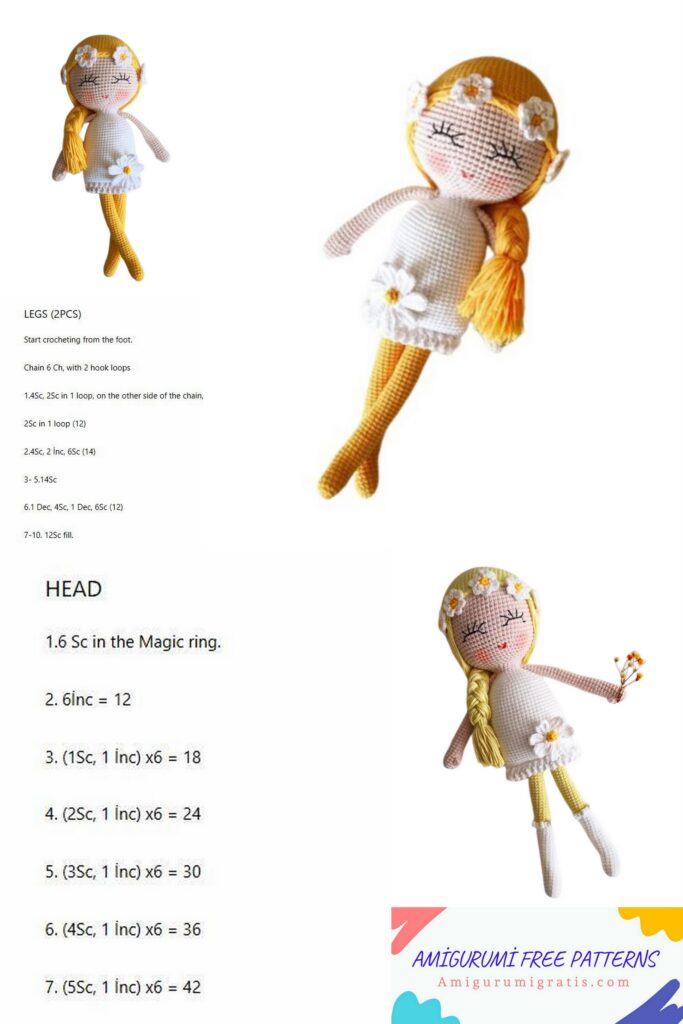
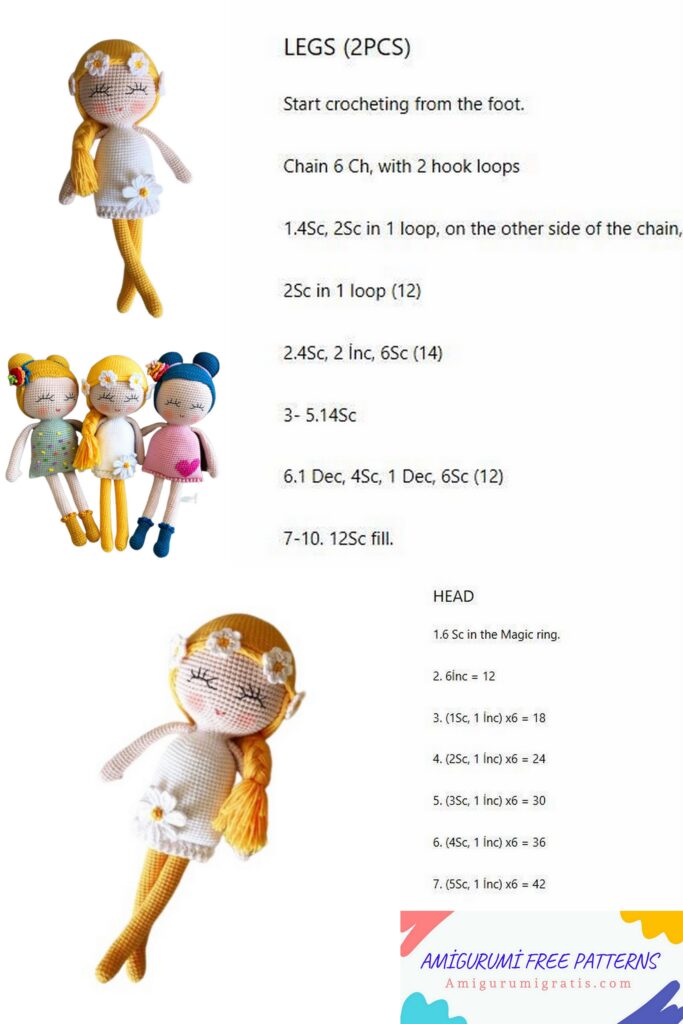
1. The head of a snow maiden:

We stuff as we knit.

1st row – 6 sc in the amigurumi ring

2 row – 6 inc (12)

3 row – (1 sc, inc) x 6 (18)

4 row – (2 sc, inc) x 6 (24)

5 row – (3 sc, inc) x 6 (30)

6 row – (4 sc, inc) x 6 (36)


7 row – (5 sc, inc) x 6 (42)

8 row – (6 sc, inc) x 6 (48)

9 row – (7 sc, inc) x 6 (54)

10 row– (8 sc, inc) x 6 (60)

11 row – (9 sc, inc) x 6 (66)


12-22 rows – 66 sc

23 row – 25 sc, (dec, 2 sc) x 3, dec, 5 sc, (dec, 2 sc) x 3, dec, 8 sc (58)

24 row – 58 sc

25 row – 27 sc, 6 inc, 9 sc, 6 inc, 10 sc (70)

26-31 rows – 70 sc

32 row – 1 sc, dec, 9 sc, dec, 10 sc, dec, 33 sc, dec, 9 sc (66)

33 row – (9 sc, dec) x 6 (60)

34 row – (8 sc, dec) x 6 (54)

35 row – (7 sc, dec) x 6 (48)

36 row – (6 sc, dec) x 3, 6 sc, 3 inc, (6 sc, dec), 5 sc, dec (46)


37 row – (5 sc, dec) x3, 4 sc, dec, 6 sc, dec, 4 sc, dec, 5 sc (40)

38 row – (4 sc, dec) x 3, 5 sc, 6 loops to knit together, 5 sc, dec, 2 sc, dec (30)

39 row – (3 sc, dec) x 6 (24)

40 row – (2 sc, dec) x 6 (18)

41 row – (1 sc, dec) x 6 (12)

Snow Maiden’s body:

Keep knitting

1-4 rows – 12 sc

5 row – (1 sc, inc) x 6 (18)

6 row – (2 sc, inc) x 6 (24)

7 row – (3 sc, inc) x 6 (30)


8 row – 30 sc

9 row – (4 sc, inc) x 6 (36)

10 row – 36 sc

11 row – (5 sc, inc) x 6 (42)

Insert the wire (the wire reaches the middle of the head).

12-19 rows -42 sc

20 row – (5 sc, dec) x6 (36)

21 row – 36 sc

22 row – (4 sc, dec) x 6 (30)

23-24 rows – 30 sc

25 row – (4 sc, inc) x 6 (36)

26 row – (5 sc, inc) x 6 (42)

27-29 rows – 42 sc

30 row – (5 sc, dec) x6 (36)

31 row – 36 sc 32 row – (4 sc, dec) x 6 (30)

33 row – 30 sc

34 row – (3 sc, dec) x 6 (24)

35 row – 24 sc

36 row – (2 sc, dec) x 6 (18)

37 row – 18 sc


38 row – (1 sc, dec) x 6 (12)

39 row – 6 dec (6) Pull the loops, cut the thread and hide it.

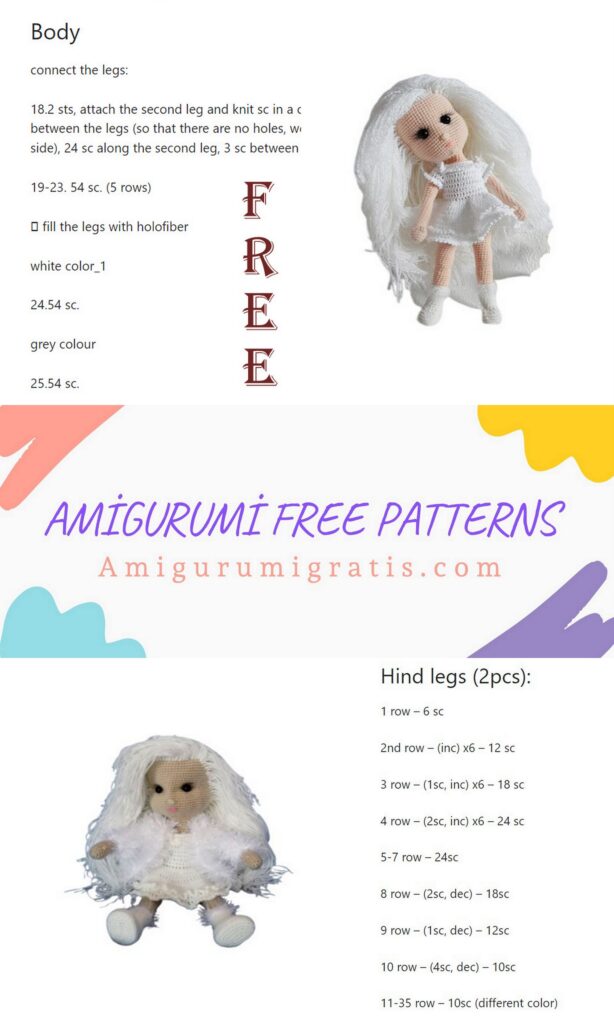
Legs of crocheted dolls:

We begin to knit a boot (white thread). Tie a chain of 7 loops.

1 row – from the second loop – 5 sc, 3 sc to the extreme, we knit on the other side of the chain: 4 sc, inc (14)

2 row – inc, 4 sc, 3 inc, 4 sc, 2 inc (20)

3 row – 1 sc, inc, 4 sc, (1 sc, inc) x3, 4 sc, (1 sc, inc) x2 (26)

4th row – 2 sc, inc, 4 sc, (2 sc, inc) x3, 4 sc, (2 sc, inc) x2 (32)

5 row – 32 sc we knit for the back walls. Cut the insole.

6-7 rows – 32 sc

8 row – 10 sc, 5 dec hdc, 10 sc, dec (26) +1 offset loop 9 row – 7 sc,, 5 dec hdc, 7 sc, dec (20)

10 row – 5 sc, 4 dec, 7 sc (16)

11-20 rows – 16 sc (You can knit 18-20 rows with textured yarn)

Change thread to flesh, fill, insert wire.

21 rows – 16 sc behind the back wall

22-23 rows – 16 sc

24th row – 1 sc, 2 inc, 13 sc (18) Here I advise you to check whether the knitting has gone wrong. 2 inc should be centered on the back of the leg. 25 – 27 rows – 18 sc

28 row – 2 sc, 2 dec, 12 sc (16)

29 row – 7 sc, dec, 4 inc, dec, 1 sc (18) (4 inc is the knee)

30, 31 rows – 18 sc

32 row – (2 sc, inc) x2, 7 sc, dec, 3 sc (19)


33-38 rows – 19 sc

39 row – 4 sc, inc, 2 sc, inc, 11 sc (21)

40-52 rows – 21 sc 53 row – (5 sc, dec) x3 (18) Bite off the excess wire, bend it in the loop.

54 row – (1 sc, dec) x6 (12)

55 row – 6 dec (6) Pull the loops, cut the thread and hide it. Link 2 details. ly:

1st row – 6 sc in the amigurumi ring

2 row – 6 inc (12)

3 row – (3 sc, inc) x3 (15)

4, 5 rows – 15 sc

6 row – 1 sc, 1 magnificent column, 13 sc (15)

7 row – 15 sc

8 row – 8 sc, dec, 5 sc (14)

9 row – 1 sc, dec, 11 sc (13)

10 row – 7 sc, dec, 4 sc (12)

11 row – 7 sc, dec, 3 sc (11)

At one end of a piece of wire, make a loop and insert into the palm of your hand, add filler. Next, fill the handle as you knit.

12-22 rows – 11 sc

23 row – 4 sc, inc, 5 sc, inc (13)

24-35 rows – 13 sc

Bite off the excess wire, bend the end.

36 row – dec, 11 sc (12) 37 row – 6 dec (6)

Pull the thread, fasten, cut. Link two details.

Assembly and design:

Attach arms and legs with pins. Sew on.

We make eye tightening. We mark with pins places for tightening – between 24 and 25 rows. Between pins 8-9 loops. We perform several stitches. Glue the eyes.

Between the 29th and 30th rows we make several stitches for the spout.

Embroider the mouth.

We outline the hair line.


Daisy Girl Amigurumi Free Pattern

0

ABBREVIATIONS

Mr: Magic ring

Sc: Single crochet

inc: Increase (make 2 sc in 1 st)

dec: Decrease (crochet 2 sts together)

BLO: Back Loop Only

FLO: Front Loop Only

Hdc: Half double crochet

Dc: Double crochet

Tr: Treble/triple crochet

Fpslst: Front post slip stitch

Ch: Chain

Slst: Slip stitch

(…) * x times: Repeat instruction between parantheses x times

(…): Indicates the number of sts you should have at the end of each round or row.

MATERIALS

*Skin color: Alize Cotton Gold 382

*Light yellow: Smc Catania 00403

*Dark yellow: Alize Cotton Gold 216

*White: Alize Cotton Gold

* 2.20 mm or a hook that fits your yarn

*Fiberfill

*Embroidery thread to form mouth and eyes

FOOT AND LEG

Note: Both dolls on the cover page are formed using the same pattern, but there is a sock detail on one of them. The pattern instructions are for the detailed sock pattern but you can crochet without this detail if you desire.

Start with sock color (white).

1- 6 sc in a mr (6)

2- (inc)* 6 times (12)

3- (5 sc, inc)*2 times (14)

4-8(5 rnds) Sc around (14)

9- Ch 1, turn, 7 sc (7)

10- Ch 1, turn, skip 1 st, 4 sc, skip 1 st (5)

11- Ch 1, turn, skip 1 st, 2 sc, skip 1 st (3)

12- Ch 1, turn, skip 2 sts,1 sc (1)

13- Do not turn. Sc 3 into side sts, sc 7 into front sts, sc 3 into the sts of other side. Place the stitch marker here. (14)

14-27(14 rnds)- Sc around (14)

28- Work FLO: 14 sc (14)

To form the ruffles on socks: Join your yarn into the first st of Round 28 and, work (1 Tr, 1 sc)- until the end of the round. Break yarn and hide the yarn tail inside.

Keep crocheting the legs. Join your yarn into the first remaining loop of Round 28. Use light yellow color:

29-50(22 rnds)- Sc around (14)

Flatten the end of the legs and work 7 sc through both layers of sts around, break the yarn and weave in the end.

Crochet the second leg in the same way.

ARM (MAKE 2)

1- 6 sc in a mr (6)

2- (inc)* 6 times (12)

3-5-(3 rnds) Sc around (12)

6- Work a bobble stitch to form the finger; Work 3 dc sts in the same st, insert your hook into the top of the first dc and sl st. Work 1 sc in the same st. 11 sc (12)

7-33(27 rnds)- Sc around (12)

Crochet the second arm in the same way. Stuff the hand section only.

Count 31 rounds up from the end of the body (the round we will work the border of the skirt) and sew the arms between 31st and 32nd rounds on each side of the body.

HEAD

1- 6 sc in a mr (6)

2- (inc)* 6 times (12)

3- (1 sc, inc)*6 times (18)

4- (2 sc, inc) *6 times (24)

5- (3 sc, inc)*6 times (30)

6- (4 sc, inc)*6 times (36)

7- (5 sc, inc)*6 times (42)

8- (6 sc, inc)*6 times (48)

9- (7 sc, inc)*6 times (54)

10- (8 sc, inc)*6 times (60)

11- (9 sc, inc)*6 times (66)

12- (10 sc, inc)*6 times (72)

13-26(14 rnds)- Sc around (72)

27- (10 sc, dec)*6 times (66)

28- (9 sc, dec)*6 times (60)

29- (8 sc, dec)*6 times (54)

30- (7 sc, dec)*6 times (48)

31- (6 sc, dec)*6 times (42)

32- (5 sc, dec)*6 times (36)

33- (4 sc, dec)*6 times (30)

34- (3 sc, dec)*6 times (24)

35-37(3rnds)- Sc around (24)

BODY

Change to body color (white).

38- Sc around (24)

39- (3 sc, inc)*6 times (30)

40- (4 sc, inc)*6 times (36)

41- (5 sc, inc)*6 times (42)

42- (6 sc, inc)*6 times (48)

43- (7 sc, inc)*6 times (54)

44-69(26 rnds)- Sc around (54)

70- Work BLO: Sc around (54)

Flatten the piece and start joining each side by working sl sts.

Inserting your hook through both layers of sts (one st facing you and the other placed at the back of it) work 6 sl st, place the first leg here (the last two rounds of the leg should be placed into the body), (insert your hook into the next st of the body and the corresponding leg st and sl st 1) * 7 times to fix the leg into the body, sl st into the next st, place the second leg in the same way with the first one, 6 sl st. Do not forget to add some more fiberfill before closing the gap.

SKIRT BORDER

Join your yarn into the first st of Round 70 on the body. Work (1 tr, 1 sc)- until the end of the round. Work 54 sc over the sts of the previous round. Work (1 tr, 1 sc)- until the end of the round one more time.

HAIR CAP

Repeat rounds 1-12 of the head.

13-24(12 rnds) Sc around (72)

25- 27 sc, 45 hdc

26- 27 sc, 45 hdc

27- 27 sc, 45 hdc, 27 sl st. Break yarn leaving a

long tail for sewing.

** The 27 sl st we we worked will be placed in front of the head. Place the cap as in the pictures and sew it on the head.

** Cut strands of yarn in 40 cm long in adequate number. Attach them using your hook around the head (do not attach them over the 27 sl sts). Braid and form them.

EYE EMBROIDERY

After sewing the hair cap, embroider eyes between Round 23 and 24 of the head.There should be 6 hair cap sts on the left or right (depending on the eye side) of your starting point. Embroider the eyes with a distance of 4 sts between them. Please look through the pictures above to follow the steps.

MOUTH

Embroider them out between Round 27 and 29 as in the pictures.

SMALL DAISIES

Start with yellow color. 6 sc in a mr. Change to white color. Ch 2, 1 dc in the next st, ch 2 and sc in the same st. (Ch 2, 1 dc in the next st, ch 2 and sc in the same st)- repeat until the end of the round. There will be 7 petals at the end of the round. Make 5 small daisies in total. Sew them in the front and on each side of the hair cap.

BIG DAISY

Make 1. Please look through the pictorials while working on it.

1- 7 sc in a mr (7)

2- Sc around (7)

3- Sc around (7)

Change to white color. Join your yarn into the first front loop. (Ch 6, starting from the second st from your hook; 1 sc, 2 hdc, 1 sc, 1 sl st over the ch sts, sl st into the same loop. Sl st in the next front loop)- repeat until the end of the round. At the end of the round sl st into the first st of the round.From now on, we will be working around the petals, (Keep working on the other side of the ch sts; 1 sl st, 1 sc, 2 hdc, 2 sc in the next st, 1 sl st. Now you are at the top of the petal.

(fpslst)* 6 times.)-repeat these steps for all the petals. There will be 7 petals in total. Place and sew the big daisy as in the pictures.

Amigurumi Pinokyo Tarifi ve Yapılışı

0

Çocukluğumuzun en güzel günlerini geçirirken bolca hikayesini işittiğimiz pinokyo tarifi ile karşınıza geldik. Bu yazımızda size amigurumi pinokyo nasıl yapılır ve yaparken dikkat etmeniz gereken hususlar nelerdir bunlardan bahsedeceğiz. Hepimizin çocukluğunda güzel bir hatıra bırakan bu karakteri çocuklarınızla tanıştırmayı ihmal etmemelisiniz.

Amigurumi pinokyo modelimiz için kullanılan malzeme ve kısaltmalar neler gelin hep birlikte balkım. Unutmadan hatırlatmak isterim ki yayınladığımız ücretsiz tariflerden daha hızlı haberdar olmak için facebook sayfa ve grubumuzda sizleride aramızda görmek isteriz.Amigurumi Pinokyo Tarifi

Amigurumi pinokyo yapımı

Ayak, Bacak ve Gövde Yapımı

Modelimizi yapmaya kırmızı iple başlıyoruz.

1=9 zincir çekilir.
2=2.ilmekten itibaren 7x,1w,7x(17x)
3=1v,4x,7v,4x,1v(26x)
4=5x,15hdc,6x(26x)
5=5x,1a,4x,1a,4x,1a,5x,1a(22x)
6=4x,1a,2x,1a,2x,1a,2x,1a,2x,1a(17x)
7=5x,4a,4x,(13x)
8=Ten rengi ipe geçiyoruz. 5x,1a,6x,(12x) Blo olarak örülecek.

9-19=(12x)
20=Kırmızı renge geçiyoruz. (2x,1v)*4 (16x)
21=16x Blo olarak örüyoruz.
22-25=(16x)
26=İki bacağı bir zincir ile birleştiriyoruz.(34x)
27=Ön ve arkada tam orta kısmında 1v arttırmalar yapıyoruz.(36x)
28-32=(36x)
33=Flo kısmından 36x Kırmızı ile örüyoruz.Aynı sıranın Blo kısmından mavi ip ile 36x örüyoruz. Bu sıra oyuncağın bel kısmı olacak.İsterseniz bu kısmı sadece Blo olarak mavi iple örebilirsiniz.

34=(4x,1a)*6 (30x)
35-38=(30x)
39=(3x,1a)*6 (24x)
40-43=24x
44=(2x,1a)*6(18x)
45=(1x,1a)*6 (12x) Bitir.

Kafa

Ten rengi ip ile pinokyomuzun kafasını örmeye başlıyalım.

1=6x sihirli halkayla
2=6v(12x)
3=(1x,1v)*6 (18x)
4= (2x,1v)*6 (24x)
5=(3x,1v)*6 (30x)
6=(4x,1v)*6 (36x)
7=(5x,1v)*6 (42x)
8-17=(42x) –13 ile 14. Sıralar arasına göz takılacak–

18= (5x,1a)*6 (36x)
19=(4x,1a)*6 (30x)
20=(3x,1a)*6 (24x)
21=(2x,1a)*6 (18x)
22=(1x,1a)*6 (12x)
23-24=(12x) Dikmek için ip bırakarak bitir.

Kollar

Modelimizin kollarından iki adet ve beyaz renk olacak şekilde örüyoruz.

1=6x sihirli halkayla
2=6v(12x)
3= (12x)
4=1 popcorn,11x(12x)
5=1a,10x(11x)
6=4x,1a,4x(10x)
7=Flo olarak 4x,1v,4x,1v beyaz ipi bitir.
7.sırada Blo kısmından ten rengi iple 10x
8-15=10x


Mavi renk ipe geç.
16-20=(10x) dikmek için ip bırakarak bitir.

Saç (peruk)

1=6x sihirli halkayla
2=6v(12x)
3=(1x,1v)*6 (18x)
4= (2x,1v)*6 (24x)
5=(3x,1v)*6 (30x)
6=(4x,1v)*6 (36x)
7=(5x,1v)*6 (42x)
8=(6x,1v)*6 (48x)
9-14=(48x)
15=19 hdc,2cc,1x,1hdc,1dc,5 üçlü trabzan,V(üçlü trabzanla arttır.),5 Üçlü trabzan, V(üçlü trabzanla arttır.),12hdc Bitir.

Şapka:

1=6x sihirli halkayla
2=6v(12x)
3=(12x)
4=(1x,1v)*6 (18x)
5=(18x)
6= (2x,1v)*6 (24x)
7=(24x)
8=(3x,1v)*6 (30x)
9=(30x)
10=(4x,1v)*6 (36x)

11=(36x)
12=(5x,1v)*6 (42x)
13=(42x)
14=(6x,1v)*6 (48x)
15-16= Sarı iple(48x)
17=Mavi iple (7x,1v)*6(54x)
18=(4x,1v)*10,4x(64x)
19-20=(64x) Bitir.

Burun

Modelimizin kafasına dikeceğimiz burnu   ten rengi iple örüyoruz.


1=6x sihirli halkayla
2-6=6x
Burun gözlerin ortasına az altına dikilecek.

Papyon

Pinokyomuzun papyonu sarı iple örelim

17 zincir üzerine 7 sıra 15x örülecek, ortadan iple sıkılacak.

Salopet(pantolon) Askıları

Pantolon askısı belirgin olması adına kırmızı iple örüyoruz.

Arka sağ ve soldan 35 sık iğne üzerine sık iğne yapılacak, önde dikilecek. İstenirse önde pantolonla birleşen yere düğme koyabilirsiniz.

Free Pattern – Stocking Ornament

0

Brighten up your holidays with this cute little stocking ornament. Hang it on your tree, tie it on a present, add it to a wreath or garland, or use it as a gift bag for a small gift. The pattern works up quickly and easily, which is good, because you’ll want to make a bunch of them! You can use any size yarn you like, so it’s a great scrapbuster too.Stocking ornament - a free crochet pattern on Stitches n Scraps

Materials:

  • Any yarn – yardage will vary based on yarn size.
    • Main color (A)
    • Accent color (B)
  • Appropriate hook for your yarn.
  • Yarn needle

    Skill Level:

    Intermediate – single crochets in the round with some shaping and color changes.

    Size / Gauge:

    Exact gauge is not critical, use any size hook that you are comfortable with for your yarn. Size and yardage will vary depending on the yarn and hook used. The sample shown is about 4 inches tall, and 2 inches wide at the cuff.  I used DK weight yarn, about 20-25 yds each of 2 colors, and a size G (4mm) hook.

    Abbreviations used:

    • ch = chain
    • sc = single crochet
    • sc2tog = single crochet the next 2 stitches together.
    • st(s) = stitch(es)

      Toe & Foot:

      Rnd 1: With A, ch 2, 6 sc in 2nd ch from hook. (6 sc)

      Rnd 2: (2 sc in next st, sc in next st) around. (9 sc)

      Rnd 3: (2 sc in next st, sc in next 2 sts) around. (12 sc)

      Rnd 4: Repeat rnd 3. (16 sc)

      Rnds 5-10: Sc in each st around.

      Ankle:

      Rnd 11 (create opening for heel): Ch 8, sk next 8 sts, sc in next 8 sts. (8 sc, 8 chs)

      Rnd 12: Sc in each ch and each sc around (16 sts)

      Rnd 13-16: Sc in each st around, changing to B in last st of rnd 16. Cut A.

      Cuff & Loop:

      Rnds 17-28: With B, sc in each st around. Fasten off B.

      Fold cuff over a little more than halfway, so that it just covers the color change from Rnd 16.

      Loop: Join A with sl st at center back of folded cuff, centered above the heel opening. Ch 12, sl st in same st as joining, fasten off A.Ready for heel - Stocking ornament - a free crochet pattern on Stitches n Scraps

      Heel:

      With right side facing, join B with sl st in first skipped st from rnd 11.

      Rnd 1: Ch 1, sc in each of the 8 skipped sts from rnd 11, sc in side of row at edge of heel opening, sc in bottom of each of the 8 chs from rnd 11, sc in side of row at edge of heel opening. (18 sc)sc in side of row - Stocking ornament - a free crochet pattern on Stitches n Scraps

      Rnd 2: (Sc2tog, sc in next 4 sts, sc2tog, sc in next st) twice. (14 sts)

      Rnd 3: (Sc2tog, sc in next 2 sts, sc2tog, sc in next st) twice. (10 sts)

      Rnd 4: (Sc2tog twice, sc in next st) twice. (6 sts)

      Fasten off B, leaving a 6 inch tail. Use tail to sew last round of heel closed.

      Finishing:

      There is a tail at the top of the cuff. After folding the cuff over, sew that tail through to the inside of the stocking. This will help hold the cuff in place and allow you to weave that tail in more easily.

      Turn stocking inside out and weave in all ends.Stocking ornament - a free crochet pattern on Stitches n Scraps

Amigurumi Angela Doll Free Crochet Pattern

0

Amigurumi Angela Doll Free Crochet Pattern

Hello dear Amigurumi Knitting Lovers,Today we share a free amigurumi crochet pattern for you.
As you know, we share new amigurumi free patterns every day. master crochets, amigurumi gazelles, amigurumi bears, amigurumi pola, amigurumi pandas, amigurumi penguins, amigurumi giraffes, amigurumi lama, amigurumi pigs, amigurumi rabbit, amigurumi clowns, amigurumi dolls, amigurumi unicorn, amigurumi elephants, amigurumi unicorn , amigurumi hippos, amigurumi monkeys, amigurumi cats, amigurumi dogs and more…
Don’t forget to subscribe to receive notifications of our new free recipes.

Today, the new daily crochet pattern Amigurumi Angela Doll Free Crochet Pattern, I want to give you some information about this pattern;


MATERIAIS

• Fio Balloon/Balloon Amigo
002 – branco
5795 – macaroon
7762 – marrom raiz
5362 – vermelho red night
• Agulha de crochê 2.00mm
• Olhos com tr • Olhos com trava de segurança tamanho 11
• Enchimento
• Tesoura
• Agulha de tapeçaria
• Botão de 0,5 cm
• Arame de artesanato (aproximadamente 30 cm)
• Cola (opcional)
• Fitas decorativa


PONTOS

pb: ponto baixo
aum: aumento (2 pb no mesmo ponto)
aum-triplo: aumento triplo (3 pb no mesmo ponto)
dim: diminuição invisível de ponto baixo
corr: correntinha
pbxmo: ponto baixíssimo
mpa: meio ponto alto
pa: ponto alto
aum-pa: aumento de ponto alto
FLO: “front loop only” – apenas nas alças da frente
BLO: “back loop only” – apenas nas alças de trás


BRAÇOS

Cor 5795 – agulha 2.00mm

  1. 6 pb no anel mágico [6]
  2. aum x6 [12]
  3. (5 pb, aum) x2 [14]
  4. pb em cada ponto [14]
  5. (5 pb, dim) x2 [12]
    6-24. pb em cada ponto [12]
    Não coloque enchimento. Dobre a
    última carreira e faça 6 pb inserindo
    a agulha pelos dois lados da carreira.
    Arremate e esconda o fio. Faça 2


PERNAS

Comece na cor 7762 – agulha 2.00mm

  1. Faça 6 corr. Começando na 2ª corr a contar da agulha, faça pb pelas próximas 4 corr, faça 3 pb juntos na última corr. Continuando no outro lado das
    corr, faça pb pelas próximas 3 corr, aum na última corr. [12]
  2. aum, 3 pb, 3 aum, 3 pb, 2 aum [18]
  3. 1 pb, aum, 3 pb, (1 pb, aum) x3, 3 pb, (1 pb, aum) x2 [24]
  4. BLO pb em cada ponto [24]
    5-7. pb em cada ponto [24]
  5. 5 pb, 6 dim, 7 pb [18]
  6. 5 pb, 3 dim, 7 pb [15
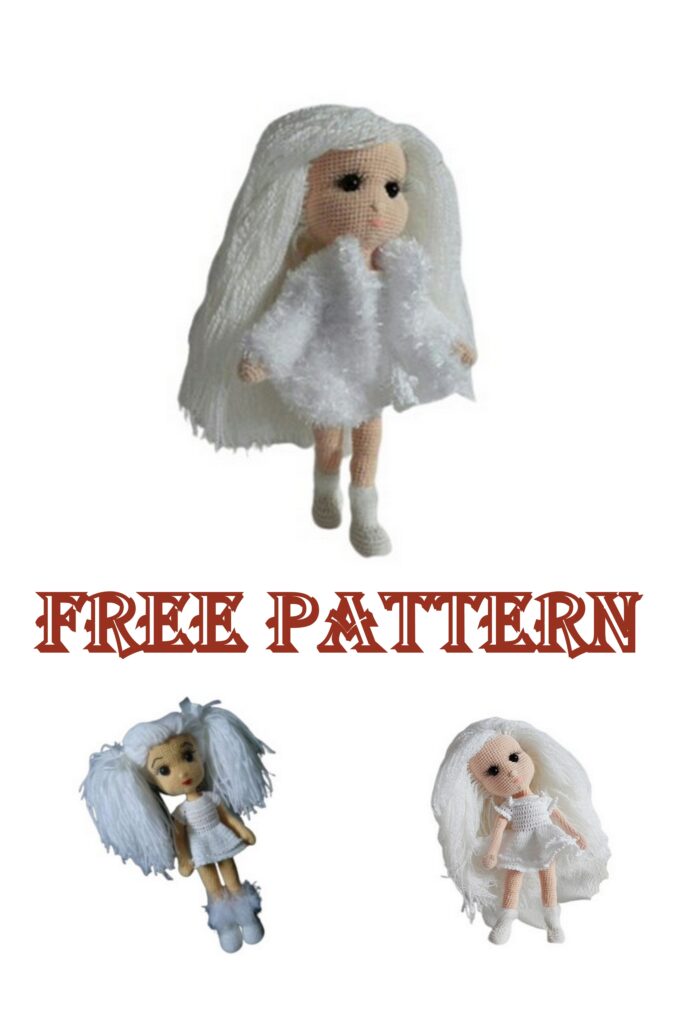
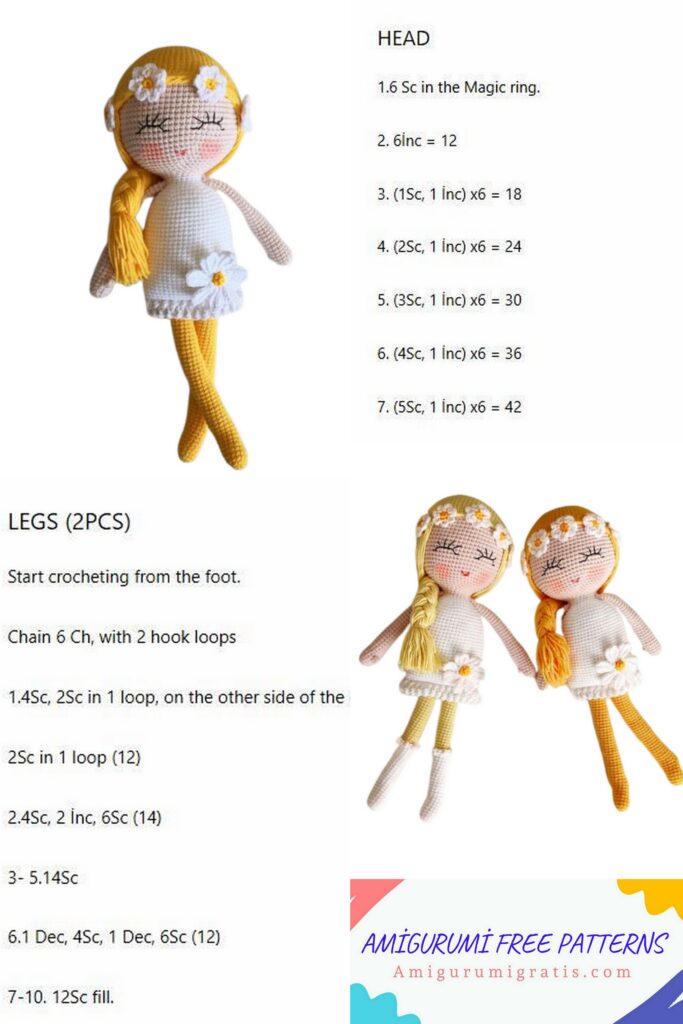
10-12. pb em cada ponto [15]
    Troque para a cor 002

    1. BLO 2 pb, aum, 7 pb, aum, 4 pb [17]
    2. pb em cada ponto [17]
      Troque para a cor 5795
    3. BLO 3 pb, aum, 7 pb, aum, 5 pb [19]
    4. pb em cada ponto [19]
      Faça 1 pbxmo em cada uma das alcinhas da frente que sobraram na carreira
      12 com a cor 7762. Faça também pbxmo em cada uma das alcinhas da carreira 14 com a cor 002.
    5. 4 pb, aum, 7 pb, aum, 6 pb [21]
    6. pb em cada ponto [21]
    7. 5 pb, aum, 7 pb, aum, 7 pb [23]
      20-24. pb em cada ponto [23]
      Arremate e esconda o fio.
      Coloque enchimento.
      Faça 2. Arremate e corte o fio de
      apenas uma das pernas, não corte o
      fio da outra, vamos formar o corpo a
      partir dessaCORPO

      Posicione as duas pernas de frente pra você, de modo que fiquem com a
      parte mais redonda dos pés virada para frente. Vamos unir as duas pernas
      para formar o corpo e estas precisam estar alinhadas para não ficarem tortas.
      Marque o ponto no meio da parte interior de cada perna, pois é onde a união
      das pernas começa. Faça pontos adicionais na 2ª perna para mover o primeiro ponto para o meio. Eu fiz 6 pontos adicionais.

      1. Continuando na 2ª perna, faça 4 correntinhas, insira a agulha no ponto marcado da 1ª perna e faça 1 pb para unir, faça pb por toda a 1ª perna (23 pb),
        pb em cada corr (4 pb), pb por toda a 2ª perna (23 pb), pb no outro lado de
        cada corr (4 pb) [total: 54 pb]
    8. 3. pb em cada ponto [54]
      1. (7 pb, dim) x6 [48]
      2. pb em cada ponto [48]
      3. (6 pb, dim) x6 [42]
        17-19. pb em cada ponto [42]
      4. (5 pb, dim) x6 [36]
        21-25. pb em cada ponto [36]
        Agora vamos unir os braços ao corpo, sem precisar de costura.
      5. 7 pb, 6 pb no braço e no corpo ao mesmo tempo, 12 pb no corpo, 6 pb
        no braço e no corpo ao mesmo tempo, 5 pb [36] Coloque enchimento.
        !! Verifique se os braços estão alinhados e simétricos em relação ao corpo!
        Caso necessário, faça a união dos braços 1-2 pontos antes ou depois.

        1. (4 pb, dim) x6 [30]
        2. (3 pb, dim) x6 [24]
        3. (1 pb, dim) x8 [16]
          30-32. pb em cada ponto [16]
          Arremate e deixe um fio longo para costurar na cabeça depoi


        CABEÇA

        Cor 5795 – agulha 2.00mm

        1. 6 pb no anel mágico
        2. aum x6 [12]
        3. (1 pb, aum) x6 [18]
        4. (2 pb, aum) x6 [24]
        5. (3 pb, aum) x6 [30]
        6. (4 pb, aum) x6 [36]
        7. (5 pb, aum) x6 [42]
        8. (6 pb, aum) x6 [48]
        9. (7 pb, aum) x6 [54]
        10. (8 pb, aum) x6 [60]
          11-24. pb em cada ponto [60]
        11. (8 pb, dim) x6 [54]
        12. (7 pb, dim) x6 [48]
          Coloque os olhos entre as carreiras 18-19 com 7 pontos visíveis de distância
          entre um e outro. Coloque enchimento.
        13. (4 pb, dim) x8 [40]
        14. (3 pb, dim) x8 [32]
        15. (2 pb, dim) x8 [24]
        16. (1 pb, dim) x8 [16]
          Arremate e esconda o fioORELHAS

          Cor 5795 – agulha 2.00mm
          Faça 6 mpa dentro de um anel mágico. Puxe o fio para juntar os pontos.
          Arremate e deixe um fio longo para costurar. Faça 2


          EXPRESSÕES

          Com a agulha de tapeçaria, faça os bordados inserindo a agulha pelo buraco
          em baixo da cabeça. Depois de fazer cada bordado, faça um nó e esconda o
          fio dentro da cabeça.

          Passo 1:
          Vamos começar “afundando” os olhos da nossa boneca. Pegue o fio da
          mesma cor da cabeça e insira pelas laterais do olho, como mostram as imagens. Deixe o fio entrar em baixo do olho até sumir. Puxe bem as pontas do
          fio para afundar os olhos. Repita no outro olho.

          Passo 2:
          Com fio branco, faça o branquinho
          dos olhos na parte lateral externa do
          olho. Repita no outro olho.
          Passo 3:
          Com fio preto, borde os cílios como
          mostram as imagens. Comece fazendo a parte superior, depois um “risquinho” na lateral externa. Repita no outro olho.

          Passo 4:
          Com fio da mesma cor da cabeça,
          borde o nariz uma carreira abaixo
          dos olhos. O nariz tem a largura de 3
          pontos baixos. Depois, passe o fio de
          baixo para cima em direção vertical
          várias vezes para obter um nariz mais cheio.
          Passo 5:
          Com fio da mesma cor do cabelo,
          borde as sobrancelhas.Passo 6:
          Passe blush rosa no nariz e nas bochechas.
          Passo 7:
          Costure as orelhas em cada lado da
          cabeça na altura dos olhos

          CABELO

          Cor 7762 – agulha 2.00mm

          1. 6 pb no anel mágico
          2. aum x6 [12]
          3. (1 pb, aum) x6 [18]
          4. (2 pb, aum) x6 [24]
          5. (3 pb, aum) x6 [30]
          6. (4 pb, aum) x6 [36]
          7. (5 pb, aum) x6 [42]
          8. (6 pb, aum) x6 [48]
          9. (7 pb, aum) x6 [54]
          10. (8 pb, aum) x6 [60]
          11. (9 pb, aum) x6 [66]
            12-16. pb em cada ponto [66]
            Para fazer a franja, continue trabalhando na mesma peça.
            Faça 11 correntinhas, pule 1, faça 1 pb em cada corr até o final [10 pb]
            Pule 1 ponto de base e faça um pbxmo no próximo pb da carreira 16.
            Faça 10 correntinhas, pule 1, faça 1 pb em cada corr até o final [9 pb]
            Pule 1 ponto de base e faça um pbxmo no próximo pb da carreira 16.
            Faça 9 correntinhas, pule 1, faça 1 pb em cada corr até o final [8 pb]
            Pule 1 ponto de base e faça um pbxmo no próximo pb da carreira 16.
            Repita essa parte mais 7 Repita essa parte mais 7 vezes.
            Faça 10 correntinhas, pule 1, faça 1 pb em cada corr até o final [9 pb]
            Pule 1 ponto de base e faça um pbxmo no próximo pb da carreira 16.
            Faça 11 correntinhas, pule 1, faça 1 pb em cada corr até o final [10 pb]
            Pule 1 ponto de base e faça um pbxmo no próximo pb da carreira 16.
            Você terá um total de 12 tiras de franja. Arremate e deixe um fio longo para
            costurar. Coloque o cabelo em um ângulo na cabeça, como mostram as imagens. Com a ajuda de alfinetes, fixe cada tira de franja na “testa” da boneca.
            Deixe as 2 tiras mais longas para trás das orelhas. Com a agulha de tapeçaria,
            costure o cabelona cabeça da boneca. Você pode costurar ou fixar as tiras
            de franja com cola.Agora vamos fazer as “chiquinhas” do cabelo.

            1. Faça 6 pb no anel mágico
            2. aum x6 [12]
            3. BLO (1 pb, aum) x6 [18]
              !! É importante que você faça a carreira 3 do jeito que está descrito, fazendo
              os pontos apenas nas alcinhas de trás.
              Faça 55 correntinhas, pule 1, faça 1 pb em cada corr até o final [54 pb]
              Faça um pbxmo no próximo ponto de base da carreira 3.
              Repita essa parte mais 17 vezes.
              Você terá um total de 18 tiras de cabeloFaça um pbxmo na alcinha da frente que sobrou na carreira 2. Agora vamos fazer mais 6 tiras de cabelo.
              Faça 55 correntinhas, pule 1, faça 1 pb em cada corr até o final [54 pb]
              Pule 1 alcinha e faça um pbxmo na próxima alcinha.
              Repita essa parte mais 5 Repita essa parte mais 5 vezes.
              Você terá um total de 6 tiras de cabelo.
              Faça 2 chiquinhas, uma para cada lado da cabeça. Costure na cabeça.Antes de costurar a cabeça no corpo é necessário fazer uma sustentação no
              pescoço da boneca para evitar que a cabeça fique mole. Eu usei arame de artesanato, mas você também pode usar outro método, como um bastão de cola quente ou até mesmo fazer um terceiro braço de crochê e colocar bastante enchimento dentro.
              Eu peguei o arame de artesanato de 30 cm, dobrei ao meio e coloquei dentro
              da boneca de modo que ficou entre a barriga e o meio da cabeça.
              Costure a cabeça no corpo, alinhando ponto com ponto (a cabeça terminou
              com 16 pontos, e o corpo também terminou com 16 pontos).

              VESTIDO

              Cor 5362 – agulha 2.00mm
              No final de cada carreira, faça 1 corr e vire o trabalho (carreiras de ida e
              volta). Lembrando que aum-triplo significa fazer 3 pontos baixos em um só
              ponto ou correntinha.
              Faça 34 corr + 5 corr para acomodar um botão de 0,5 cm (faça menos ou
              mais corr dependendo do tamanho do botão que você tiver). Pule as 5 corr
              do botão, insira a agulha na 6ª corr e faça:

              1. 5 pb, aum-triplo, 5 pb, aum-triplo, 10 pb, aum-triplo, 5 pb, aum-triplo, 5 pb
                [42]
              2. 6 pb, aum-triplo, 7 pb, aum-triplo, 12 pb, aum-triplo, 7 pb, aum-triplo, 6 pb
                [50]
              3. 8 pb, 9 aum, 16 pb, 9 aum, 8 pb [68]
              4. 8 pb, 3 corr, pula 18 pontos, 16 pb, 3 corr, pula 18 pontos, 8 pb [38]
              5. 8 pb, pb em cada corr, 16 pb, pb em cada corr, 8 pb [38]
              6. pb em cada ponto [38]
              7. Faça 2 corr, faça 2 pontos altos em cada alcinha de trás dos pontos [76]
                Faça 1 pbxmo no 1º pa para unir. A partir de agora, trabalhe em carreiras contínuas (sem virar o trabalho), unindo com pbxmo a cada nova carreira; faça 1
                pbxmo no 1º pa para unir e 2 corr para começar a nova carreira.
              8. (1 pa, aum-pa) x38 [114]
                9-14. pa em cada ponto [114]
              9. Faça 2 pontos altos em cada alcinha de trás dos pontos altos [228]Agora vamos fazer as mangas.
                Na carreira 4 do vestido, nós pulamos 18 pontos em cada manga. Vamos trabalhar nesses 18 pontos para fazer o detalhe babadinho.
                Pegue um novo fio e insira na alcinha do primeiro ponto de uma manga.
                Faça 2 corr e 2 pontos altos nessa mesma alcinha. Agora faça 4 pontos altos na próxima alcinha, e 3 pontos altos na próxima alcinha.
                Repita ** até o final.
                Faça a mesma coisa na outra manga.
                Costure um botão na parte de trás para fechar e abrir o vestido.Prenda fitas no cabelo e nas perninhas da boneca e faça um lacinho.

                URSINHO

                Cor 002 – agulha 2.00mm


                CABEÇA

                1. 8 pb no anel mágico [8]
                2. (1, aum) x4 [12]
                3. pb em cada ponto [12]
                4. 3 pb, 6 aum, 3 pb [18]
                5. 3 pb, (1 pb, aum) x6, 3 pb [24]
                6. pb em cada ponto [24]
                7. 3 pb, (aum, 2 pb) x6, 3 pb [30]
                  8-12. pb em cada ponto [30]
                8. (3 pb, dim) x6 [24]
                  Coloque enchimento.
                9. (2 pb, dim) x6 [18]
                10. (1 pb, dim) x6 [12]
                11. dim x6 [6]
                  Arremate, deixando um pedaço de
                  fio. Com a agulha de tapeçaria, passe
                  o fio pelos 6 pontos restantes para
                  fechar a cabeça. Esconda o fio.
                  Com linha preta, borde o nariz e os olhos.


                ORELHAS

                1. 8 pb no anel mágico [8]
                  Arremate e deixe um fio longo para
                  costurar. Faça 2. Costure as orelhas
                  na cabeça entre as carreiras 8-9.

                CORPO
                6 pb no anel mágico [6]
                aum x6 [12]
                (1 pb, aum) x6 [18]
                (2 pb, aum) x6 [24]
                5-9. pb em cada ponto [24]

                1. (2 pb, dim) x6 [18]
                  11-13. pb em cada ponto [18]
                2. (1 pb, dim) x6 [12]
                  Coloque enchimento. Arremate e
                  deixe um fio longo para costurar.BRAÇOS

                  1. 8 pb no anel mágico [8]
                    2-7. pb em cada ponto [8]
                    Não coloque enchimento.
                    Arremate, deixando um pedaço de
                    fio para costurar. Com a agulha de
                    tapeçaria, passe o fio pelos 8 pontos
                    restantes para fechar. Faça 2.


                  PERNAS

                  1. 6 pb no anel mágico [6]
                  2. aum x6 [12]
                    3-4. pb em cada ponto [12]
                  3. 2 pb, 4 dim, 2 pb [8]
                    6-7. pb em cada ponto [8]
                    Não coloque enchimento.
                    Arremate, deixando um pedaço de
                    fio para costurar. Com a agulha de
                    tapeçaria, passe o fio pelos 8 pontos
                    restantes para fechar. Faça 2.
                    • Costure a cabeça no corpo.
                    • Costure os braços no corpo, entre
                    as carreiras 13-14.
                    • Costure as pernas no corpo, entre
                    as carreiras 7-8.
                    Enfeite o ursinho com fita decorativa.FINISH

Amigurumi Enola Girl Free Crochet Pattern

0

Amigurumi Enola Girl Free Crochet Pattern

Hello dear Amigurumi Knitting Lovers
Today we share a free amigurumi crochet pattern for you. As you know, we share new amigurumi free patterns every day. master crochets, amigurumi gazelles, amigurumi bears, amigurumi pola, amigurumi pandas, amigurumi penguins, amigurumi giraffes, amigurumi lama, amigurumi pigs, amigurumi rabbit, amigurumi clowns, amigurumi dolls, amigurumi unicorn, amigurumi elephants, amigurumi unicorn , amigurumi hippos, amigurumi monkeys, amigurumi cats, amigurumi dogs and more…

We can say that Christmas time is approaching now, so I wanted to present you the santa claus amigurumi toy. You can prepare wonderful crochet handmade amigurumi dolls for your children at Christmas time. To create a step by step crochet amigurumi pattern, you must follow the instructions completely.

ABREVİACOES:

MATERİAİS:

BRAÇOS (X2):

PERNAS (X2):

PERNAS (cont):

CORPO:

CORPO (cont):

CABEÇA:

CABEÇA (cont):

CABELO:

SAİA:

SAPATOS:

LAÇO:

MİNİ LACİNHO:

BLUSA:

CASACO:

FINISH!

Amigurumi Sheep Free Crochet Pattern

0

Hello dear Amigurumi Knitting Lovers,Today we share a free amigurumi crochet pattern for you.
As you know, we share new amigurumi free patterns every day. master crochets, amigurumi gazelles, amigurumi bears, amigurumi pola, amigurumi pandas, amigurumi penguins, amigurumi giraffes, amigurumi lama, amigurumi pigs, amigurumi rabbit, amigurumi clowns, amigurumi dolls, amigurumi unicorn, amigurumi elephants, amigurumi unicorn , amigurumi hippos, amigurumi monkeys, amigurumi cats, amigurumi dogs and more…
Don’t forget to subscribe to receive notifications of our new free recipes.

Today, the new daily crochet pattern Amigurumi Sheep Free Crochet Pattern, I want to give you some information about this pattern;

Materials and tools:

  1. Sport yarn:
  • Light beige (YarnArt Jeans 05)
  • Dark beige (YarnArt Jeans 48)
  • Pink (YarnArt Jeans 36)
  1. Plush yarn – White (Himalaya Dolphin Baby – 80363/80301/80302)
  2. Brown and rose thread to embroider eyebrows and nose
  3. Thin white thread for sewing
  4. Safety eyes 8 mm
  5. Crochet hook 2.00 mm and 4.00 mm
  6. Stuffing (Polyester fiber fill)
    If you use these materials, the finished toy is around 21-23 cm (8-9″) tall.
    There are no crochet instructions included in the pattern.
    It’s assumed that you’re familiar with the basic crochet stitches.
    The difficulty level of the pattern is medium.
    In this pattern is used US terminology.


Abbreviations:
st – stitch
ch – chain
sl st – slip stitch
sc – single crochet
dc – double crochet
tr – treble crochet
inc – increase
dec – decrease
(sc, inc)*n – repeat those in brackets n-times


Arms:
Start crocheting with the dark beige yarn, hook 2 mm:

  1. 6 sc into a magic ring (6)
  2. 6 inc (12)
  3. (sc, inc)*6 (18)
  4. (5 sc, inc)*3 (21)
    5-6. 21 sc (2 rounds)
  5. (5 sc, dec)*3 (18)
  6. 2 sc, dec, (4 sc, dec)*2, 2 sc (15)
    Change the yarn to light beige color:
    9-16. 15 sc (8 rounds)
  7. (3 sc, dec)*3 (12)
  8. 12 sc (12)
    Stuff only 2/3 of the arms.
  9. 4 sc, fold in half and crochet 6 sc through both sides.
    Fasten off, cut the yarn.
    Sew the arms in round 15 of the body.


    Hello dear Amigurumi Knitting Lovers,Today we share a free amigurumi crochet pattern for you.
    As you know, we share new amigurumi free patterns every day. master crochets, amigurumi gazelles, amigurumi bears, amigurumi pola, amigurumi pandas, amigurumi penguins, amigurumi giraffes, amigurumi lama, amigurumi pigs, amigurumi rabbit, amigurumi clowns, amigurumi dolls, amigurumi unicorn, amigurumi elephants, amigurumi unicorn , amigurumi hippos, amigurumi monkeys, amigurumi cats, amigurumi dogs and more…
    Don’t forget to subscribe to receive notifications of our new free recipes.

    Today, the new daily crochet pattern Amigurumi Sheep Free Crochet Pattern, I want to give you some information about this pattern;


    Materials and tools:


    1. Sport yarn:
    • Light beige (YarnArt Jeans 05)
    • Dark beige (YarnArt Jeans 48)
    • Pink (YarnArt Jeans 36)
    1. Plush yarn – White (Himalaya Dolphin Baby – 80363/80301/80302)
    2. Brown and rose thread to embroider eyebrows and nose
    3. Thin white thread for sewing
    4. Safety eyes 8 mm
    5. Crochet hook 2.00 mm and 4.00 mm
    6. Stuffing (Polyester fiber fill)
      If you use these materials, the finished toy is around 21-23 cm (8-9″) tall.
      There are no crochet instructions included in the pattern.
      It’s assumed that you’re familiar with the basic crochet stitches.
      The difficulty level of the pattern is medium.
      In this pattern is used US terminology.


    Abbreviations:
    st – stitch
    ch – chain
    sl st – slip stitch
    sc – single crochet
    dc – double crochet
    tr – treble crochet
    inc – increase
    dec – decrease
    (sc, inc)*n – repeat those in brackets n-times


    Arms:
    Start crocheting with the dark beige yarn, hook 2 mm:

    1. 6 sc into a magic ring (6)
    2. 6 inc (12)
    3. (sc, inc)*6 (18)
    4. (5 sc, inc)*3 (21)
      5-6. 21 sc (2 rounds)
    5. (5 sc, dec)*3 (18)
    6. 2 sc, dec, (4 sc, dec)*2, 2 sc (15)
      Change the yarn to light beige color:
      9-16. 15 sc (8 rounds)
    7. (3 sc, dec)*3 (12)
    8. 12 sc (12)
      Stuff only 2/3 of the arms.
    9. 4 sc, fold in half and crochet 6 sc through both sides.
      Fasten off, cut the yarn.
      Sew the arms in round 15 of the body.


    Legs:
    Start crocheting with the dark beige yarn, hook 2 mm:

    1. 6 sc into a magic ring (6)
    2. 6 inc (12)
    3. (sc, inc)*6 (18)
    4. sc, inc, (2 sc, inc)*5, sc (24)
    5. (3 sc, inc)*6 (30)
      6-8. 30 sc (3 rounds)
    6. 6 sc, (sc, dec)*6, 6 sc (24)
    7. 6 sc, 6 dec, 6 sc (18)
      Change the yarn to light beige color:
      11-19. 18 sc (9 rounds)
    8. (sc, dec)*6 (12)
    9. 12 sc (12)
      Stuff only 2/3 of the legs.
    10. Make 1 sc (or as much as you need for the feet to be facing forward). Fold the leg in half and crochet 6 sc through both sides.
      Fasten off, cut the yarn.
      Sew the legs between rounds 5 and 6.
    11. Body:
      Crochet with the plush yarn, hook 4 mm:

      1. 6 sc into a magic ring (6)
      2. 6 inc (12)
      3. (sc, inc)*6 (18)
      4. sc, inc, (2 sc, inc)*5, sc (24)
      5. (3 sc, inc)*6 (30)
        6-9. 30 sc (4 rounds)
      6. (3 sc, dec)*6 (24)
      7. 24 sc (24)
      8. (2 sc, dec)*6 (18)
        13-14. 18 sc (2 rounds)
      9. (sc, dec)*6 (12)
      10. 12 sc (12)
        Change the yarn to light beige and the hook to 2 mm.
        Stuff the body firmly, especially in the neck.
        Cut the plush yarn, we will continue with the head:

         Amigurumi Sheep Free Crochet Pattern


        Hello dear Amigurumi Knitting Lovers,Today we share a free amigurumi crochet pattern for you.
        As you know, we share new amigurumi free patterns every day. master crochets, amigurumi gazelles, amigurumi bears, amigurumi pola, amigurumi pandas, amigurumi penguins, amigurumi giraffes, amigurumi lama, amigurumi pigs, amigurumi rabbit, amigurumi clowns, amigurumi dolls, amigurumi unicorn, amigurumi elephants, amigurumi unicorn , amigurumi hippos, amigurumi monkeys, amigurumi cats, amigurumi dogs and more…
        Don’t forget to subscribe to receive notifications of our new free recipes.

        Today, the new daily crochet pattern Amigurumi Sheep Free Crochet Pattern, I want to give you some information about this pattern;


        Materials and tools:


        1. Sport yarn:
        • Light beige (YarnArt Jeans 05)
        • Dark beige (YarnArt Jeans 48)
        • Pink (YarnArt Jeans 36)
        1. Plush yarn – White (Himalaya Dolphin Baby – 80363/80301/80302)
        2. Brown and rose thread to embroider eyebrows and nose
        3. Thin white thread for sewing
        4. Safety eyes 8 mm
        5. Crochet hook 2.00 mm and 4.00 mm
        6. Stuffing (Polyester fiber fill)
          If you use these materials, the finished toy is around 21-23 cm (8-9″) tall.
          There are no crochet instructions included in the pattern.
          It’s assumed that you’re familiar with the basic crochet stitches.
          The difficulty level of the pattern is medium.
          In this pattern is used US terminology.


        Abbreviations:
        st – stitch
        ch – chain
        sl st – slip stitch
        sc – single crochet
        dc – double crochet
        tr – treble crochet
        inc – increase
        dec – decrease
        (sc, inc)*n – repeat those in brackets n-times


        Arms:
        Start crocheting with the dark beige yarn, hook 2 mm:

        1. 6 sc into a magic ring (6)
        2. 6 inc (12)
        3. (sc, inc)*6 (18)
        4. (5 sc, inc)*3 (21)
          5-6. 21 sc (2 rounds)
        5. (5 sc, dec)*3 (18)
        6. 2 sc, dec, (4 sc, dec)*2, 2 sc (15)
          Change the yarn to light beige color:
          9-16. 15 sc (8 rounds)
        7. (3 sc, dec)*3 (12)
        8. 12 sc (12)
          Stuff only 2/3 of the arms.
        9. 4 sc, fold in half and crochet 6 sc through both sides.
          Fasten off, cut the yarn.
          Sew the arms in round 15 of the body.


        Legs:
        Start crocheting with the dark beige yarn, hook 2 mm:

        1. 6 sc into a magic ring (6)
        2. 6 inc (12)
        3. (sc, inc)*6 (18)
        4. sc, inc, (2 sc, inc)*5, sc (24)
        5. (3 sc, inc)*6 (30)
          6-8. 30 sc (3 rounds)
        6. 6 sc, (sc, dec)*6, 6 sc (24)
        7. 6 sc, 6 dec, 6 sc (18)
          Change the yarn to light beige color:
          11-19. 18 sc (9 rounds)
        8. (sc, dec)*6 (12)
        9. 12 sc (12)
          Stuff only 2/3 of the legs.
        10. Make 1 sc (or as much as you need for the feet to be facing forward). Fold the leg in half and crochet 6 sc through both sides.
          Fasten off, cut the yarn.
          Sew the legs between rounds 5 and 6.


        Body:
        Crochet with the plush yarn, hook 4 mm:

        1. 6 sc into a magic ring (6)
        2. 6 inc (12)
        3. (sc, inc)*6 (18)
        4. sc, inc, (2 sc, inc)*5, sc (24)
        5. (3 sc, inc)*6 (30)
          6-9. 30 sc (4 rounds)
        6. (3 sc, dec)*6 (24)
        7. 24 sc (24)
        8. (2 sc, dec)*6 (18)
          13-14. 18 sc (2 rounds)
        9. (sc, dec)*6 (12)
        10. 12 sc (12)
          Change the yarn to light beige and the hook to 2 mm.
          Stuff the body firmly, especially in the neck.
          Cut the plush yarn, we will continue with the head:


        Head:
        Continue crocheting with the light beige yarn. Stuff as you go.

          1. back loops only: Make 2 sc in every st of the body (24)
          2. (sc, inc)*12 (36)
          3. (2 sc, inc)*12 (48)
          4. (7 sc, inc)*6 (54)
          5. 4 sc, inc, (8 sc, inc)*5, 4 sc (60)
          6. (9 sc, inc)*6 (66)
            7-9. 66 sc (3 rounds)
          7. 12 sc, (sc, dec)6, 6 sc, (sc, dec)6, 12 sc (54)
          8. 23 sc, put a marker for the first eye, 9 sc, put a marker for the second eye, 22 sc (54)
            12-19. 54 sc (8 rounds)
            Insert the safety eyes in the marked points.
          9. (7 sc, dec)*6 (48)
          10. 3 sc, dec, (6 sc, dec)*5, 3 sc (42)
          11. (5 sc, dec)*6 (36)
          12. 2 sc, dec, (4 sc, dec)*5, 2 sc (30)
          13. (3 sc, dec)*6 (24)
          14. (sc, dec)*8 (16)
          15. 8 dec (8)
            Make sure that the head is stuffed firmly.
            Close the opening and hide the yarn inside.

        Head sculpting (look at the pictures):
        Mark the points 1 and 2, 3 and 4 with pins, as it’s shown in the photo.
        Insert a long threaded needle through the head bottom and pull it out from the point 1. Then reinsert into the point 2 and pull out from the head bottom.
        Continue with the needle sculpting for the second eye in the same way. Pull the thread ends and tie a knot. Hide the thread inside the head.
        Embroider the muzzle with the brown thread. It should be one round under the eyes and four rounds long. Continue with the eyebrows. They should be in round 16 of the head.
        Embroider the nose with the rose thread right above the muzzle.
        Pain the cheeks with a pink eyeshadow or pastel.

        Plush cap:
        Crochet with the plush yarn, hook 4 mm:

        1. 8 sc into a magic ring (8)
        2. 8 inc (16)
        3. (sc, inc)*8 (24)
        4. (3 sc, inc)*6 (30)
        5. 2 sc, inc, (4 sc, inc)*5, 2 sc (36)
        6. (5 sc, inc)*6 (42)
          7-11. 42 sc (5 rounds)
          Make a sl st, fasten off and cut the yarn.
          (Note: If you crochet very wide, skip round 6 and make 4-5 rounds of 36 sc)
          Sew the plush cap on the head with the thin white thread. Grab only the back loops of the cap to make the stitch invisible. The cap should be right above round 19 in the front and near the neck in the back.Ears:
          Crochet with light beige yarn, hook 2 mm

          1. 6 sc into a magic ring (6)
          2. (sc, inc)*3 (9)
          3. (2 sc, inc)*3 (12)
          4. (3 sc, inc)*3 (15)
          5. (4 sc, inc)*3 (18)
            6-8. 18 sc (3 rounds)
          6. (4 sc, dec)*3 (15)
          7. (3 sc, dec)*3 (12)
            Fasten off and cut the yarn, leaving a tail for sewing.
            Fold the ear in half and sew the opposite sides together.
            Sew the ears on the plush cap near round 15.Tail:
            Crochet with the light beige yarn, hook 2 mm:

            1. 6 sc into a magic ring (6)
            2. (sc, inc)*3 (9)
            3. (2 sc, inc)*3 (12)
            4. (3 sc, inc)*3 (15)
              5-6. 15 sc (2 rounds)
              Fasten off and cut the yarn, leaving a tail for sewing.
              Sew the tail on the back in round 6.
            5. Ribbon:
              Crochet with the pink yarn, hook 2 mm:
              Make a magic ring (or chain 2) and crochet in it: (3 ch, 3 tr, 3 ch, sl st)*2.
              Tighten the magic ring, fasten off and cut the yarn leaving a tail for sewing.
              Wrap the yarn around the ribbon a few times. Make a knot.
              Make 2 ribbons and sew them above the ears.
            6. FINISH

1. Cute Bunny Baby Booties

0

If you want to bring a dose of cuteness to your baby booties, then crochet bunny booties are an excellent choice. The fluffy bunny ears and the adorable embroidered faces will make these booties an instant hit with both parents and the little one. Here’s how you can create them:

Crochet Animal Baby Bootie

Materials Needed:

  • Worsted weight yarn in white, pink, and black
  • Crochet hook (size G)
  • Yarn needle
  • Stitch markers
  • Scissors

Instructions:

  1. Start with the sole of the bootie in white yarn. Use a basic baby bootie pattern to create the base.
  2. For the bunny ears, crochet two pieces in white yarn, shaping them into ovals with pointed tips. Attach them to the top of the bootie.
  3. Use pink yarn to create the inner ear, and attach it to the white bunny ears.
  4. Embroider the bunny’s eyes, nose, and mouth with black yarn.
  5. Finish the booties with a cute little tail on the back.

These bunny baby booties will surely make the baby look as adorable as a little rabbit!

2. Fuzzy Bear Baby Booties

For a cozy and warm option, consider crocheting bear baby booties. These will keep the baby’s feet snug and toasty, while the bear face adds a charming touch. Here’s how to make them:

Materials Needed:

  • Bulky weight yarn in brown and black
  • Crochet hook (size H)
  • Yarn needle
  • Stitch markers
  • Scissors

Instructions:

  1. Start with the sole of the bootie in brown yarn, following a basic baby bootie pattern.
  2. For the bear ears, crochet two circular pieces in brown and attach them to the top of the bootie.
  3. Create the inner ear with a smaller circle in a lighter shade of brown.
  4. Embroider the bear’s eyes, nose, and mouth with black yarn.
  5. Finish the booties with a little tail on the back and perhaps some claws on the soles.

These bear booties will make the baby feel as if they’re walking with a cuddly bear by their side.

3. Whimsical Elephant Baby Booties

Elephants are known for their wisdom and grace. Crocheting elephant baby booties is a wonderful way to add a touch of wisdom to your gift. These booties feature elephant ears and trunks, making them utterly charming. Here’s how to crochet them:

Materials Needed:

  • Worsted weight yarn in gray and black
  • Crochet hook (size G)
  • Yarn needle
  • Stitch markers
  • Scissors

Instructions:

  1. Begin with the sole of the bootie in gray yarn, using a basic baby bootie pattern.
  2. For the elephant ears, crochet two large, floppy gray ear shapes and attach them to the top of the bootie.
  3. Create the inner ear with a smaller pink or gray circle.
  4. Add a crochet trunk to the front of the bootie.
  5. Embroider the elephant’s eyes with black yarn.

These elephant baby booties will surely make the baby feel as wise as an elephant.

4. Playful Penguin Baby Booties

Penguins are known for their cute waddling, and crocheting penguin baby booties can capture the essence of this charming bird. These booties feature penguin faces and flipper-like feet, making them a delightful choice for a baby gift. Here’s how to make them:

Materials Needed:

  • Worsted weight yarn in black, white, and orange
  • Crochet hook (size G)
  • Yarn needle
  • Stitch markers
  • Scissors

Instructions:

  1. Start with the sole of the bootie in black yarn, following a basic baby bootie pattern.
  2. For the penguin’s face, crochet a white oval and attach it to the front of the bootie.
  3. Crochet two orange penguin feet and attach them to the sides.
  4. Create a black beak, and use black yarn to embroider the penguin’s eyes.
  5. Finish the booties with a penguin tail on the back.

These penguin baby booties will have the baby waddling in style.

5. Adorable Owl Baby Booties

Owls symbolize wisdom and knowledge, making them a fantastic choice for baby booties. Crochet owl baby booties are both charming and meaningful, making them a perfect gift for a little one. Here’s how to create them:

Materials Needed:

  • Worsted weight yarn in various colors for the owl’s body, wings, and eyes
  • Crochet hook (size G)
  • Yarn needle
  • Stitch markers
  • Scissors

Instructions:

  1. Start with the sole of the bootie in a color of your choice.
  2. Crochet two owl faces in a different color and attach them to the top of the bootie.
  3. Create the owl’s wings in the same color as the face and attach them to the sides.
  4. Make two large owl eyes using two different colors and attach them to the front.
  5. Embroider the owl’s beak and feathers for extra details.

These owl baby booties are a wise and adorable choice for a baby’s first footwear.

In conclusion, crocheting animal-themed baby booties adds a delightful and personalized touch to your gift. Whether you opt for bunnies, bears, elephants, penguins, or owls, your handmade creations will surely be cherished by the baby and their parents. So, pick your favorite animal, gather your materials, and start crocheting these adorable baby booties today!

Friendly Owl Amigurumi Crochet

0

Owl Amigurumi

Materials and Tools

Gather the following supplies before you start:

  • Yarn: Brown, white, and orange. Medium weight (4) yarn is recommended.
  • Crochet Hook: Size 3.5 mm.
  • Fiberfill: For stuffing.
  • Stitch Markers: To keep track of rounds.
  • Yarn Needle: For sewing parts together.
  • Scissors.
  • Safety Eyes: 9 mm, or use black yarn for embroidered eyes.

Skill Level

Intermediate. Basic knowledge of crochet stitches and amigurumi techniques is helpful.

Abbreviations

  • ch: chain
  • st(s): stitch(es)
  • sc: single crochet
  • inc: increase (2 sc in one st)
  • dec: decrease (sc 2 sts together)
  • sl st: slip stitch
  • [ ]: repeat instructions between brackets as directed

Owl Amigurumi Pattern

Body (Use brown yarn)

  1. Round 1: 6 sc in a magic ring (6 sts)
  2. Round 2: Inc in each st around (12 sts)
  3. Round 3: [Sc in next st, inc in next st] 6 times (18 sts)
  4. Rounds 4-12: Sc in each st around (18 sts)
  5. Round 13: [Sc in next st, dec] 6 times (12 sts)
  6. Fasten off, leaving a long tail for sewing. Stuff the body firmly.

Head (Use brown yarn)

  1. Round 1: 6 sc in a magic ring (6 sts)
  2. Round 2: Inc in each st around (12 sts)
  3. Round 3: [Sc in next st, inc in next st] 6 times (18 sts)
  4. Rounds 4-10: Sc in each st around (18 sts)
  5. Round 11: [Sc in next st, dec] 6 times (12 sts)
  6. Fasten off, leaving a long tail for sewing. Insert safety eyes between Rounds 8 and 9, about 4 sts apart. Stuff the head.

Wings (Make 2, use brown yarn)

  1. Round 1: 6 sc in a magic ring (6 sts)
  2. Round 2: Inc in each st around (12 sts)
  3. Rounds 3-5: Sc in each st around (12 sts)
  4. Fasten off, leaving a long tail for sewing.

Feet (Make 2, use orange yarn)

  1. Round 1: 6 sc in a magic ring (6 sts)
  2. Round 2: [Sc in next 2 sts, inc] twice (8 sts)
  3. Rounds 3-4: Sc in each st around (8 sts)
  4. Fasten off, leaving a long tail for sewing.

Beak (Use orange yarn)

  1. Row 1: Ch 2, sc in second ch from hook (1 st)
  2. Row 2: Ch 1, turn, 2 sc in st (2 sts)
  3. Row 3: Ch 1, turn, sc in each st across (2 sts)
  4. Fasten off, leaving a long tail for sewing.

Eyes (Make 2, use white yarn)

  1. Round 1: 6 sc in a magic ring (6 sts)
  2. Round 2: Inc in each st around (12 sts)
  3. Fasten off, leaving a long tail for sewing.

Assembly

  • Sew the head to the body.
  • Attach the wings to either side of the body.
  • Sew the feet to the bottom of the body.
  • Attach the beak between the eyes.
  • Sew the white eye patches in place, and then attach the safety eyes or embroider the eyes.

Conclusion

Your adorable Owl Amigurumi is now complete! This cute and cuddly creature is a testament to your crochet skills and is sure to be a hit with anyone who sees it. Whether it’s perched on a shelf, given as a thoughtful handmade gift, or used as a cozy companion, this owl is bound to bring joy and a sense of accomplishment.

Superman Amigurumi: A Step-by-Step Crochet Guide

0

Superman Amigurumi

Materials and Tools

Before you begin, ensure you have the following:

  • Yarn: Red, blue, yellow, and black. Medium weight (4) is recommended.
  • Crochet Hook: Size 3.5 mm.
  • Fiberfill: For stuffing.
  • Stitch Markers: To keep track of rounds.
  • Yarn Needle: For sewing parts together.
  • Scissors.
  • Black Embroidery Thread: For details.
  • Safety Eyes: 9 mm.

Skill Level

Intermediate. Familiarity with basic crochet stitches and amigurumi techniques is required.

Abbreviations

  • ch: chain
  • st(s): stitch(es)
  • sc: single crochet
  • inc: increase (2 sc in one st)
  • dec: decrease (sc 2 sts together)
  • sl st: slip stitch
  • [ ]: repeat instructions between brackets as directed

Superman Amigurumi Pattern

Head (Use skin-colored yarn)

  1. Round 1: 6 sc in a magic ring (6 sts)
  2. Round 2: Inc in each st around (12 sts)
  3. Round 3: [Sc in next st, inc in next st] 6 times (18 sts)
  4. Rounds 4-9: Sc in each st around (18 sts)
  5. Round 10: [Sc in next st, dec] 6 times (12 sts)
  6. Round 11: Dec around (6 sts)
  7. Fasten off, leaving a long tail for sewing. Add safety eyes between Rounds 7 and 8, about 4 sts apart. Stuff the head.

Body (Start with blue yarn)

  1. Round 1: 6 sc in a magic ring (6 sts)
  2. Round 2: Inc in each st around (12 sts)
  3. Round 3: [Sc in next st, inc in next st] 6 times (18 sts)
  4. Rounds 4-5: Sc in each st around (18 sts)
  5. Round 6: Change to red yarn, sc in each st around (18 sts)
  6. Rounds 7-11: Sc in each st around (18 sts)
  7. Fasten off, leaving a long tail for sewing. Stuff the body.

Arms (Make 2, use blue yarn)

  1. Round 1: 6 sc in a magic ring (6 sts)
  2. Rounds 2-7: Sc in each st around (6 sts)
  3. Fasten off, leaving a long tail for sewing. Lightly stuff the arms.

Legs (Make 2, start with red yarn)

  1. Round 1: 6 sc in a magic ring (6 sts)
  2. Round 2: Inc in each st around (12 sts)
  3. Rounds 3-4: Sc in each st around (12 sts)
  4. Round 5: Change to blue yarn, sc in each st around (12 sts)
  5. Rounds 6-8: Sc in each st around (12 sts)
  6. Fasten off, leaving a long tail for sewing. Stuff the legs.

Cape (Use red yarn)

  1. Row 1: Ch 12, turn, sc in second ch from hook and in each ch across (11 sts)
  2. Rows 2-10: Ch 1, turn, sc in each st across (11 sts)
  3. Fasten off, leaving a long tail for sewing.

Assembly

  • Sew the head to the body.
  • Attach the arms to the body at shoulder level.
  • Sew the legs to the bottom of the body.
  • Attach the cape to the back of Superman’s neck.
  • Use black embroidery thread to embroider the hair and facial features.

Conclusion

Congratulations! You’ve now created your very own Superman Amigurumi. This project not only brings joy in crafting but also celebrates a beloved superhero in a unique, handmade form. Share your creation with friends, family, or fellow crochet enthusiasts, and don’t forget to explore further amigurumi designs to expand your crafting journey!